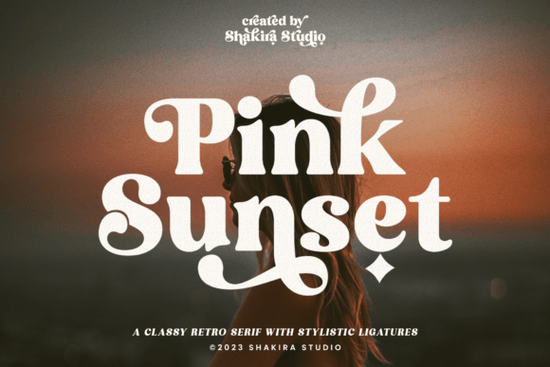
Finding the right typeface for a retro-inspired project can be tricky. You want something that feels nostalgic but still reads clearly on modern screens and printed materials. The Pink Sunset Font strikes a nice balance between a 1960s aesthetic and clean, modern readability. It works exceptionally well for crafters, small business owners, and print-on-demand sellers who need a distinct vintage vibe without sacrificing legibility.
What kind of projects work best with a retro serif?
When you are setting up a new branding kit, designing a t-shirt, or creating packaging for a small business, the style of your lettering sets the entire mood. If you are checking out this specific retro typeface for your next layout, you will notice how the subtle curves give it a warm, approachable feel. It works beautifully on canvas tote bags, ceramic mugs, and boutique storefront signage, giving small businesses a distinct identity.
Sometimes, though, a project needs a slightly different direction. You might prefer a more structured alternative for a formal corporate layout, or perhaps something with a slightly more whimsical feel for a children's book cover or playful nursery art. For apparel designs that need to stand out from a distance, a bolder, sportier vintage style often works better, while a cleaner, more minimalist approach is usually best for high-end cosmetic packaging or luxury labels.
How do you access all the extra characters and ligatures?
One of the most frustrating parts of using decorative typefaces is trying to find those special swashes and connected letters. This typeface comes with over 50 unique alternates and ligatures, which are extra character variations that make your text look custom-drawn rather than typed. Because it is PUA encoded, you do not need expensive, professional design software to access them.
If you are using basic crafting programs like Cricut Design Space, Silhouette Studio, or even standard word processors, PUA encoding is a massive time-saver. It allows you to open your computer's built-in character map, copy the special glyphs, and paste them directly into your canvas. This simple trick is incredibly helpful for:
- Logo design: Swapping out standard letters for custom swashes to make a brand mark completely unique.
- Wedding invitations: Adding elegant ligatures to names, dates, and venue details.
- Sticker making: Adjusting the tail ends of letters to fit perfectly inside a circular or custom cut line.
Does the italic version change the overall layout?
Including a dedicated italic version gives you a lot more flexibility when arranging your text on a page. Instead of just using a software tool to slant the regular letters, which can sometimes distort the strokes and make them look messy or uneven, a true italic version is drawn specifically to look good at an angle. The strokes remain balanced, and the vintage charm stays intact. This is especially useful when designing multi-line typography for merchandise or posters.
You can use the italic style to:
- Highlight specific words in a long quote, slogan, or brand mission statement.
- Create a distinct secondary line of text under a main title for posters and flyers.
- Add a subtle sense of motion to sports, travel, or lifestyle graphics.
- Differentiate between the main brand name and a descriptive tagline on business cards.
What should you check before finalizing your design?
Before you send your final file to the commercial printer, upload it to your print-on-demand platform, or cut it on your home vinyl machine, run through a quick quality check to ensure your lettering looks professional and clean.
- Check the kerning: Look closely at the spaces between capital letters and lowercase letters. Adjust the tracking manually if any gaps look too wide or too tight, especially around the custom ligatures.
- Test the legibility: Print a small test page on your home printer or view your digital design at a 10% zoom level. If the retro details and thin strokes blur together, you might need to increase the overall font size or simplify the background layout.
- Verify the cut lines: If you are making physical crafts like decals or apparel, ensure the delicate swashes are thick enough for your blade to cut cleanly without tearing the vinyl or paper.
- Review the contrast: Make sure the background color provides enough contrast so the thinner strokes do not disappear when viewed on mobile screens.
- Review the licensing: Always double-check your commercial use rights on the marketplace, especially if you plan to sell physical products or digital templates featuring the lettering.
 Conso Font: Design Your Digital Lettering Project
 Palmore Font: Design Elegance for Digital Projects
 Fantasy Magist Font: Creative Design & Typography Projects
 Jp Game Day Font Design & Download Guide
 Designing with a Classic Teacher Chalk Font
 Design with Elegant Butterfly Font Projects